
Flickity is javascript + css which can be used to create sliders & carousels.
Example results
Previously, we first saw how the final example of a slider / carousel created with flickity.js
Pros
- Responsive
- Touchable/Dragable
- Smoother transitions
- Many options
Installation Method
There are several ways to install flickity on WordPress:
- Html & CSS
- jQuery
- Vanilla Script
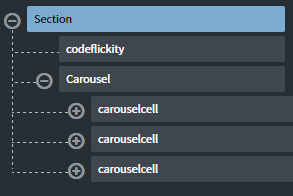
Basically when we want to use flickity, we create one div ( parent element ) with the carousel class or other classes that we define ourselves, and in that div we fill some div ( child element ) with class carousel-cell to indicate that the div is a separate carousel / slider.

Sample Code
1. Using HTML & CSS
Below is an example of HTML & CSS code to create a slider with flickity. Please modify it according to your needs.
HTML code
<!-- CSS -->
<link rel="stylesheet" href="https://unpkg.com/flickity@2/dist/flickity.min.css">
<!-- JavaScript -->
<script src="https://unpkg.com/flickity@2/dist/flickity.pkgd.min.js"></script>
<!-- html -->
<div class="carousel" data-flickity='{ "freeScroll": true, "wrapAround": true, "autoPlay": 2000 }'>
  <div class="carousel-cell" style="background:url(https://www.digitalizer.my.id/wp-content/uploads/2020/11/headroom-js-pada-WordPress-dan-Oxygen-Builder.jpg); background-size:cover;background-position:center;"></div>
  <div class="carousel-cell" style="background:url(https://www.digitalizer.my.id/wp-content/uploads/2020/10/Parallax-Effect-with-Rellax-JS-in-Oxygen-Builder.jpg);background-size:cover;background-position:center;"></div>
  <div class="carousel-cell" style="background:url(https://www.digitalizer.my.id/wp-content/uploads/2020/10/setting-website-selalu-menggunakan-https-ssl.jpg);background-size:cover;background-position:center;"></div>
  <div class="carousel-cell" style="background:url(https://www.digitalizer.my.id/wp-content/uploads/2020/10/menambah-email-di-outlook.jpg);background-size:cover;background-position:center;"></div>
  <div class="carousel-cell" style="background:url(https://www.digitalizer.my.id/wp-content/uploads/2020/07/apa-itu-wordpress.jpg);background-size:cover;background-position:center;"></div>
</div>
CSS code
.carousel {
  background: #eee;
}

.carousel-cell {
  width: 66.6%;
  height:400px;
  margin-right: 10px;
  border-radius: 5px;
}
2. Using jQuery
The jQuery script below can replace the flickity initiation with HTML (keep in mind the addition of CSS too).
I made it by adding the code to the Oxygen Builder code block . The advantage is that it is easier for us to set up the div child element because it can be adjusted via the Oxygen Builder panel.
jQuery('.carousel').flickity({
  // options
  freeScroll: false,
  wrapAround: false,
  content: true
});
For those of you who don't know about Oxygen Builder, you can read our article " Oxygen Builder, the Best WordPress Page Builder Plugin? "
3. Using Vanilla Script
If you want to use Vanilla Script to initiate flickity, you can use the code example as below. Don't forget to pay attention to the addition of CSS too.
var elem = document.querySelector('.carousel');
var flkty = new Flickity( elem, {
  // options
  cellAlign: 'left',
  contain: true
});

// element argument can be a selector string
//   for an individual element
var flkty = new Flickity( '.carousel', {
  // options
});
Options on Flickity
dragable
Can be "dragged" (click and drag). The default is enabled for 2 or more slides.
// disabling
draggable: false

// activating
draggable: true
freeScroll
This option for free slide slide doesn't have to fit on one slide always.
// disabling
freeScroll: false

// activating
freeScroll: true
prevNextButton
This option is to display the navigation arrows on the left and right of the slider.
// disabling
prevNextButtons: false

// activating
prevNextButtons: true
wrapAround
If this option is activated then after the last slider will return to the initial slider again (infinite slide).
// disabling
wrapAround: false

// activating
wrapAround: true
groupCells
This option causes the elements of several carousel-cells to become a group, so that one move will move several cells at once.
// option to move multiple cells according to the capacity accommodated in the viewport at once
groupCells: true

// if inputted with numbers, then the cell grouping will match the numbers entered
groupCells: 2

// if it is filled with percent, then the cell grouping will be grouped according to the percentage number in the currently active viewport
wrapAround: 80%
autoPlay
This option will move the slider automatically
// automatically moves every 3 seconds
autoPlay: true

// automatically moves every number input in milliseconds
// an example of the slider option moves automatically in 1500ms or 1.5s
autoPlay: 1500
pauseAutoPlayOnHover
When combined with autoPlay, then we can determine whether the slider will stop on hover or not.
// By default the slider will stop on hover
pauseAutoPlayOnHover: true

// the slider will not stop on hover
pauseAutoPlayOnHover: false
Custom PrevNext Buttons
We can use custom Previous or Next slider buttons. In this example, the slider has class .slider, previous slide button has class .slide_prev and next slide button has class .slide_next
var $slider = jQuery('.slider');

// previous
  jQuery('.slide_prev').on( 'click', function() {
    $slider.flickity('previous');
  });

  // next
  jQuery('.slide_next').on( 'click', function() {
    $slider.flickity( 'next', true );
  });
Reference
You can download javascript + css flickity and find out more about the other options on the site https://flickity.metafizzy.co/ .

Conclusion "Flickity On WordPress"
That's a little explanation about flickity in WordPress & Oxygen Builder. However, we can use this technique to apply to any website, only need to adapt it according to each platform.
What do you think? Please give your feedback in the comments column below.
Happy Digitalize Your Life!


